Lenovo X280 (Maximized)
Table of contents
⚠️ EOL: No microcode updates
This board’s CPU generation has reached End of Servicing Updates. See per-board EOL/ESU status for ESU dates and Heads threat model for security implications.
🛡️ VULNERABLE: TPM GPIO Reset
TPM TOTP/HOTP bypassable. Disk encryption with passphrase unaffected. See Per-Board Protection Status, TPM GPIO Reset Vulnerability.
Notes
Flashrom v Flashprog
NOTE: If you are unsure, flashrom is more likely to be available in your distribution’s package manager.
There is still debate over which programmer and software should be used (flashprog vs. flashrom). Before following this guide, make sure you read README.md and the related information. Whichever you use, the overall command syntax should be the same. Make sure you have read through SPI programmer best practices
xx80 Devices notes
This port of heads includes a patch for 16GB models of the X280.
Thunderbolt issues
Some ThinkPads of this series are affected by a bug in the Thunderbolt firmware. TL;DR: The flash chip fills with logs, breaking fast charging/data transfer. Slow charging still works. Heads provides a fixed, and padded Thunderbolt firmware that resolves the “charging problem”. If you do experience the “charging bug,” it is possible to fix it with external flashing. Also, the update is possible prior flashing heads using fwupd from a Linux distribution
⚡ Safety First
Before starting, please read our SPI Programmer Best Practices guide for essential safety information and programmer recommendations.
X280 Hardware Maintenance Manual
Getting inside these laptops should be straightforward.
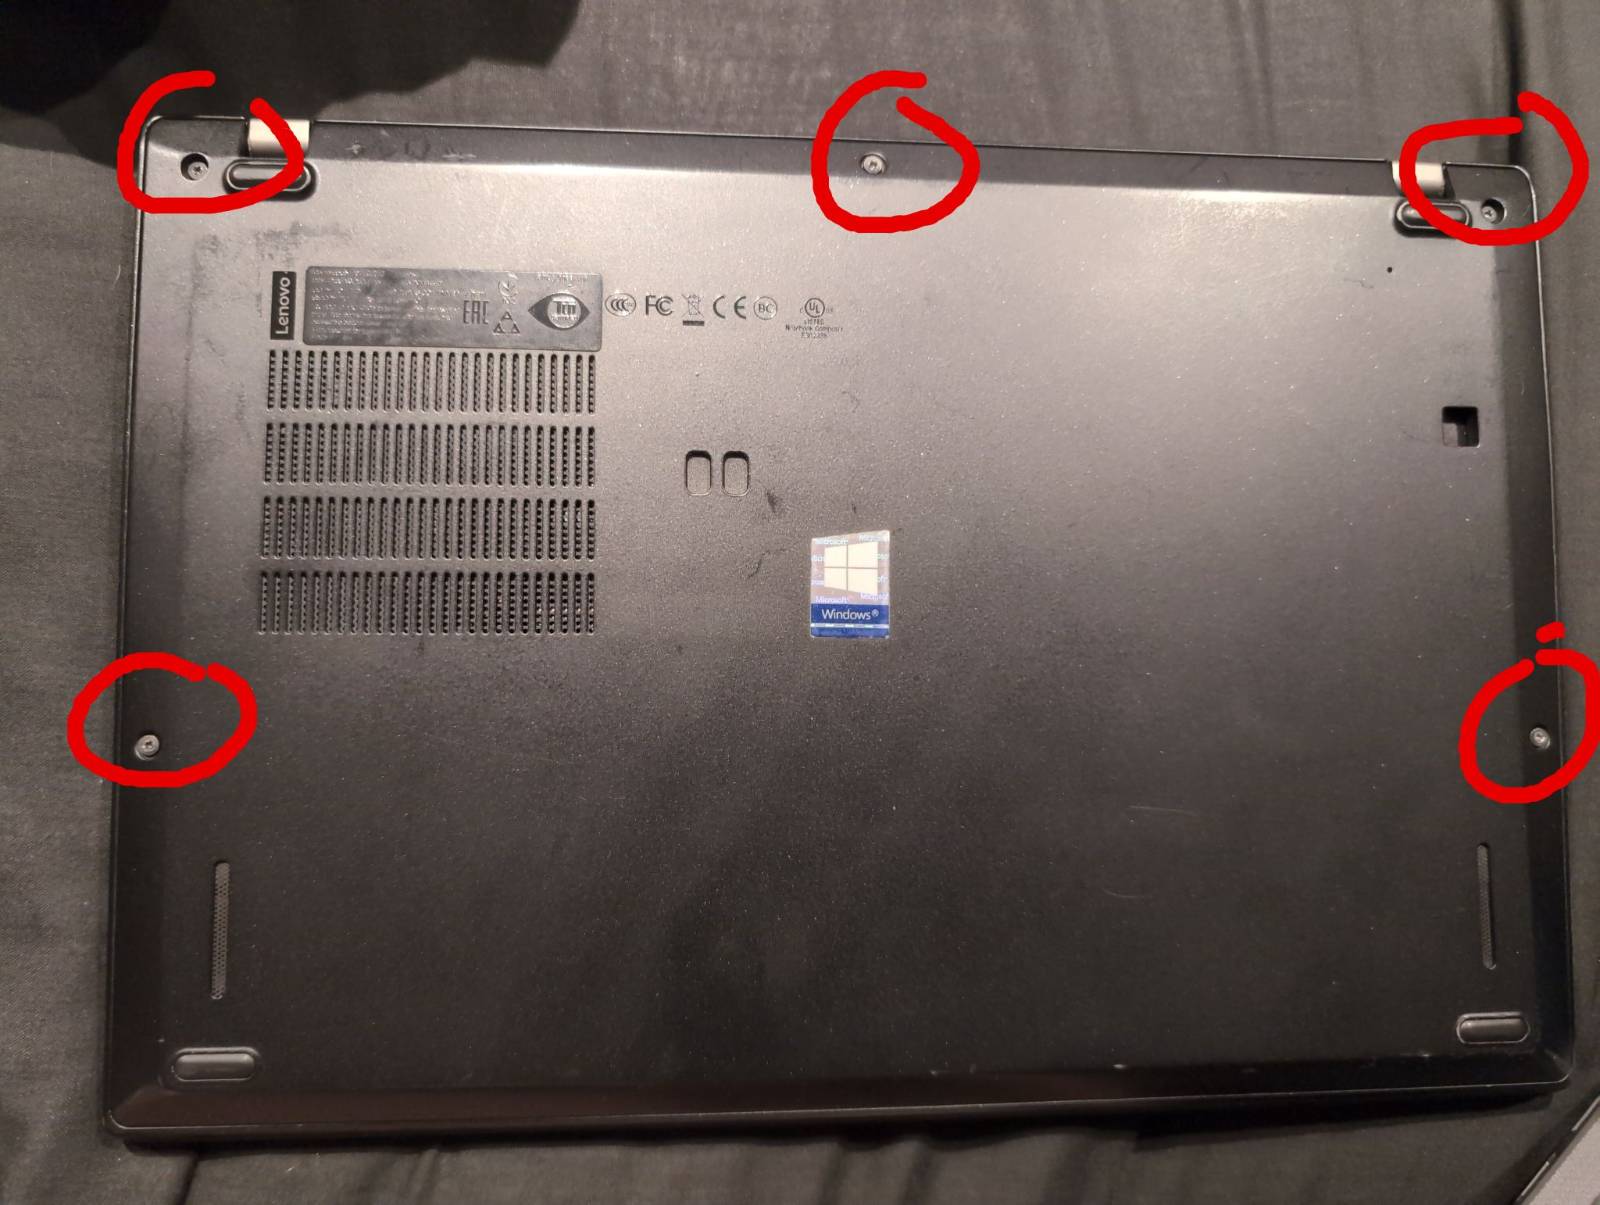
The ThinkPad X280 has two SPI flash chips important for the port. The first chip holds the BIOS, ME, etc., while the second holds the Thunderbolt firmware. To access these chips, you only need to remove the back panel, which is secured by five screws.
Required items are:
- Phillips-head screwdriver (PH0), which is standard for most laptop screws.
- A SPI programmer (recommended: Tigard or Raspberry Pi Pico/H; budget: CH347F or CH341A rev1.6+). For programmer-specific safety and example commands, see the SPI Programmer Best Practices. Using Raspberry Pi Pico as an example is described in the Libreboot flash guide.
- Other laptop/PC with a Linux-based OS installed.
It may also help to have a thin plastic card, or pick, to use as a shim.
EC Firmware
Before flashing heads, it is advisable to update the EC Firmware on the laptop. Some old EC firmware may be vulnerable to some serious CVEs. See Heads-threat-model for additional information.
The only way to update the EC Firmware, called ECP (Embedded Controller Program) by Lenovo, is to use their proprietary BIOS Update utility which typically requires a Windows system. However, you can use the BIOS Update .iso file to create a bootable USB to boot directly into the BIOS Update Utility by using geteltorito.
Locate the latest Bootable CD (.iso) file from lenovo: BIOS Update (Bootable CD) or use a direct link here
As of writing, the latest X280 BIOS Update is n20uj44w.iso (v1.59).
wget https://download.lenovo.com/pccbbs/mobiles/n20uj44w.iso
Acquire the geteltorito script. On debian, the genisoimage package contains geteltorito:
sudo apt install genisoimage
Generate a bootable image from the .iso:
geteltorito -o x280_bootable_update_utility.img n20uj44w.iso
Write the resulting image to a USB Flash drive:
sudo dd if=x280_bootable_update_utility.img of=/dev/sdX status=progress
Boot from the USB on the laptop and follow the update prompts.
Disassembly
First, disconnect the power cable from your device then begin removing the back panel by removing the five captive screws, circled in red. A guitar pick or an old credit card can be helpful for detaching the panel.
Now that the internals are visible, you need to remove the internal power (Battery, CMOS). Circled in red are four screws. Also circled (in blue) are the positions of the flash chips under the protective plastic.
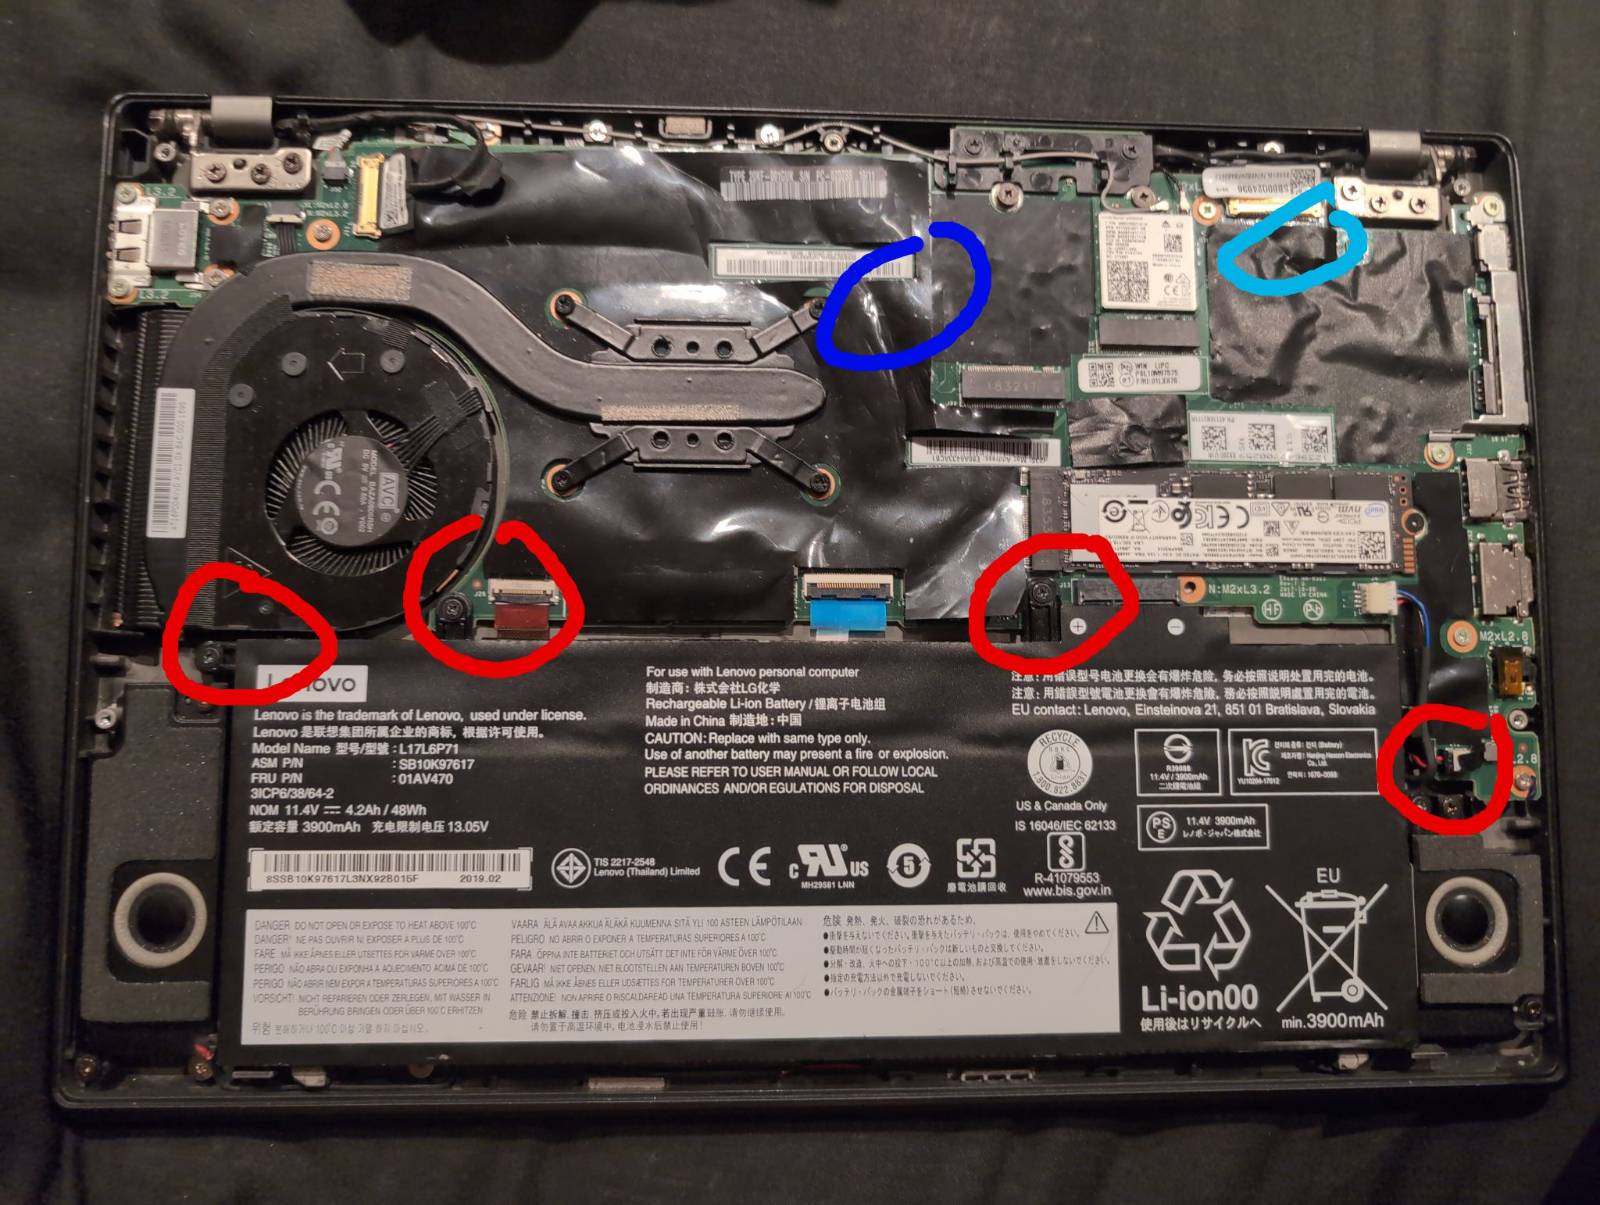
Once the screws are out, just lift the battery out of the laptop.
The top-right chip (circled in light-blue under the protective plastic) corresponds to the Thunderbolt SPI flash chip (1 MB). The chip located in the middle of the board (circled dark blue under the plastic) corresponds to the BIOS (16 MB) chip, respectively.
The chip located in the middle of the board contains the Intel Management Engine (ME) firmware.
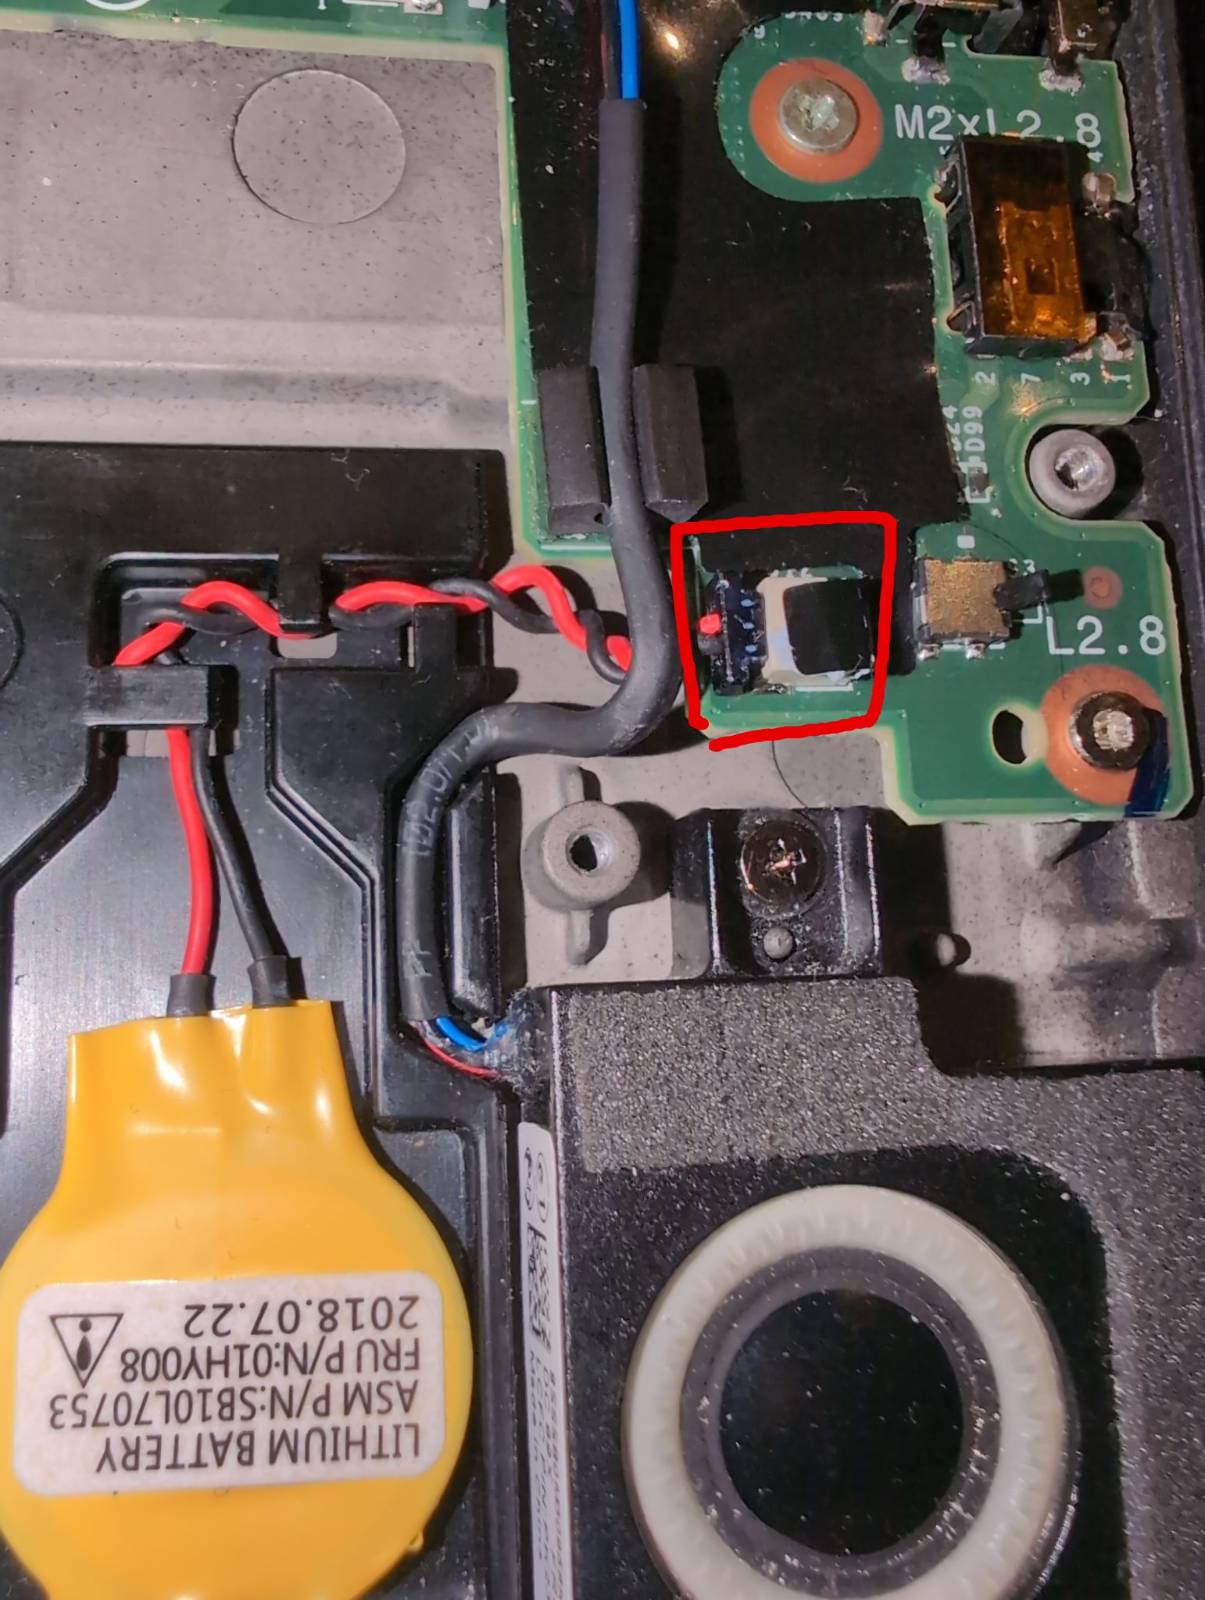
Before going further though, disconnect the CMOS battery. Circled is the connector for it. Do not tug on the wires themselves, as they are delicate.
Now with all power sources removed from the device, locate the aforementioned flash chips.
The green line shows where pin 1 is. On the chip itself, there is also a circular indent to help identify orientation. 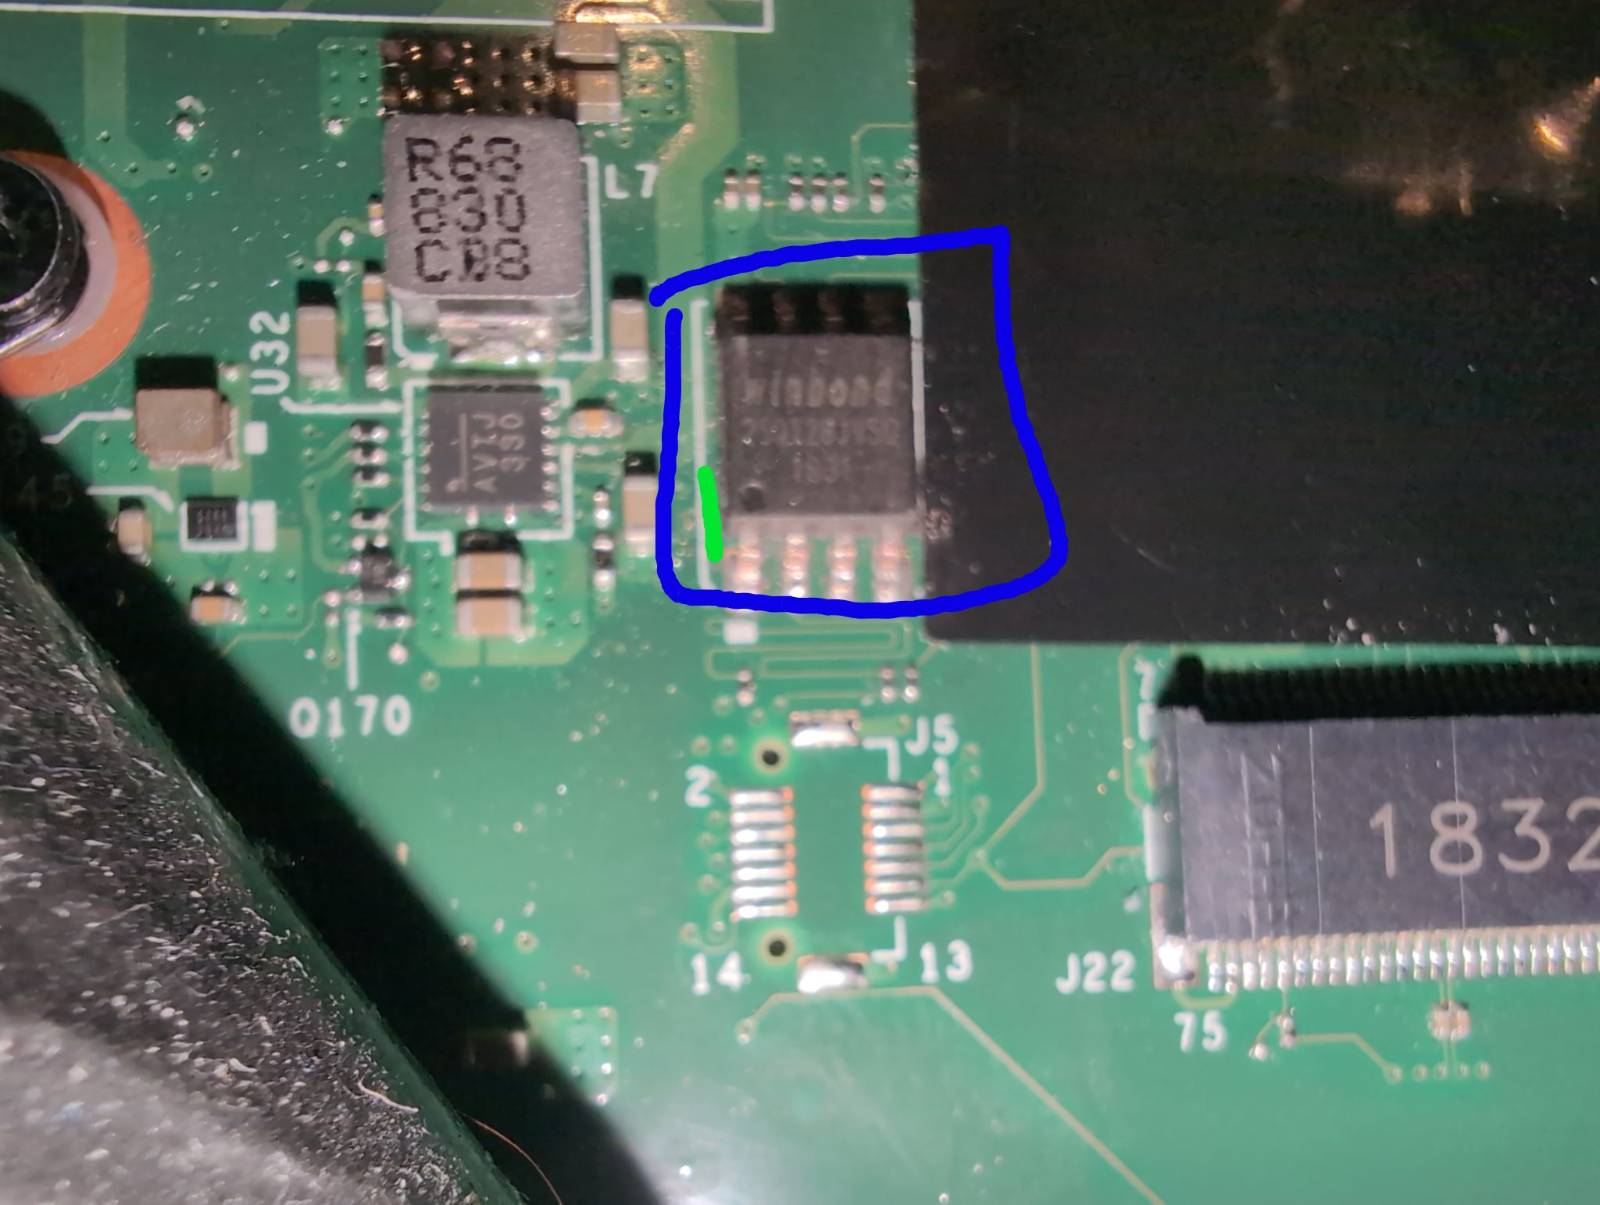 This is the main BIOS chip.
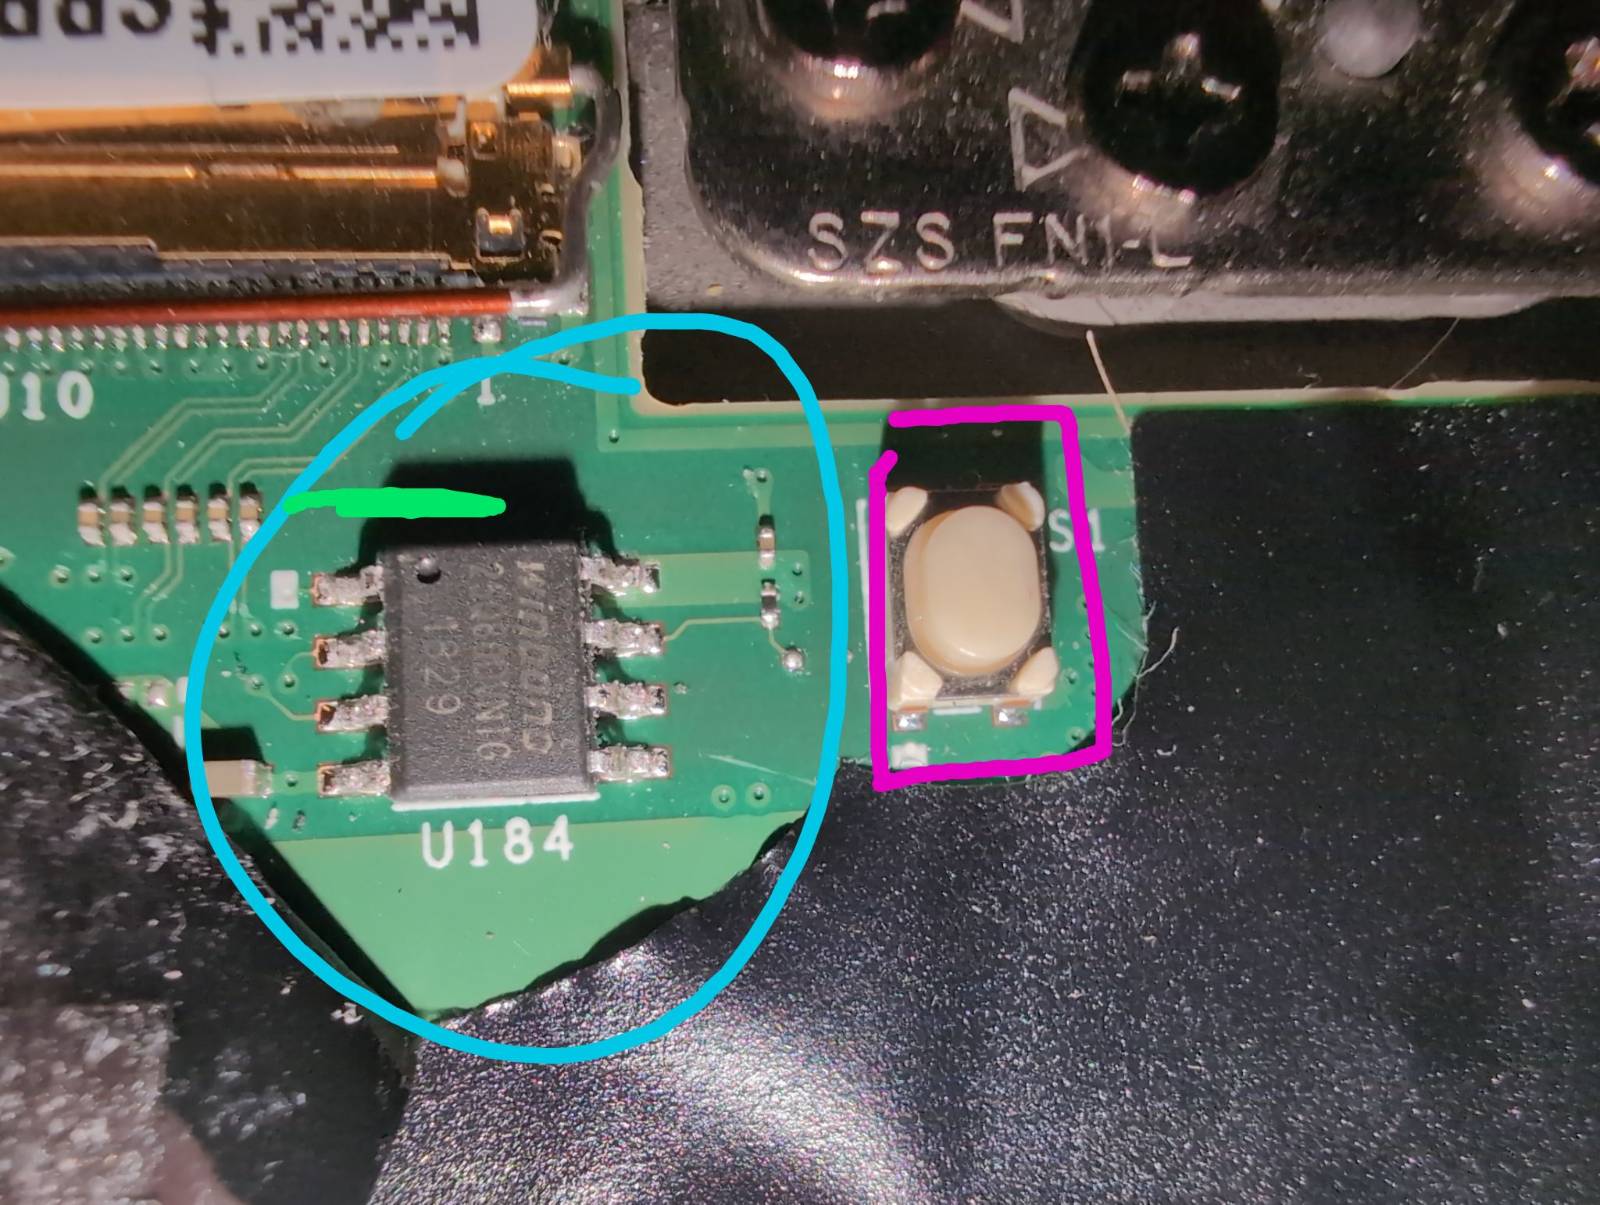 This is the Thunderbolt chip. Note it is rotated 90 degrees clockwise in relation to the main BIOS chip.
First download or build (please see general building / building x230) the board rom for this board and verify its hash value.
Try to read the name of the SPI flash chip. The dot on the chip helps to identify the correct clip orientation.
Flashing
First, connect the clip of your chosen SPI programmer (Raspberry Pi Pico was used in the sample commands) to the chip. Next, connect the programmer to the USB port of your other Linux-based computer with flashrom/flashprog installed. In my setup, the red wire should be where the dot is (the dot indicates pin 1). Here, please also see the flashing guide for the T430.
Use [flasher] of your choice (flashrom or flashprog – see Tool Interchangeability) with the programmer you selected ([programmer] – see Programmer Selection):
First, make a backup following Backup guidance Make sure that files do not differ.
sha256sum x280_original_bios.bin
sha256sum x280_original_bios_1.bin
My dumps were the same. It does not matter if yours differ from mine, as long as it hasn’t written all 0’s.
[user@flashing ~]$ sha256sum x280_original_bios.bin
bf0bb4064323810e70521668e6e0a5438ed9526e652e74c512aa8ed2010af8ca  x280_original_bios.bin
[user@flashing ~]$ sha256sum x280_original_bios_1.bin
bf0bb4064323810e70521668e6e0a5438ed9526e652e74c512aa8ed2010af8ca  x280_original_bios_1.bin
If they are the same, then write x280-hotp-maximized.rom (or without -hotp if you did not build for HOTP) to the SPI flash chip:
sudo [flasher] --programmer [programmer] -c YYY -w ~/heads/build/x86/x280-hotp-maximized/heads-x280-hotp-maximized.rom
If all goes, well you can connect the CMOS and internal battery, press the power button and you should see the keyboard LED flash. After that, Heads will boot into its GUI. Two reboots are sometimes needed after flashing. Force a power off by holding the power button for 10 seconds. Since the memory training data was wiped by the content of the fully flashed ROM, this is normal. You should then follow through with configuring keys.
Flash Thunderbolt firmware
Important, make sure there is no power connected to the device, internal or AC. After connecting the clip to the Thunderbolt chip as shown in the figure above read from the chip, making sure the connection is stable. The procedure is similar to the flashing Heads on the SPI chip. Note that the flash chip for Thunderbolt is physically slightly smaller.
Once again, bake a backup of the firmware already on it and check if it read successfully.
sha256sum x280_original_tb.bin
sha256sum x280_original_tb_1.bin
Flash the padded Thunderbolt firmware. The firmware file x280_tb.bin is located in blobs/xx80/x280_tb.bin after you build the Heads locally, or in the CircleCI artifacts.
sudo [flasher] --programmer [programmer] --chip YYY --write ~/x280_tb.bin
Hopefully, all went well, and now you see heads. 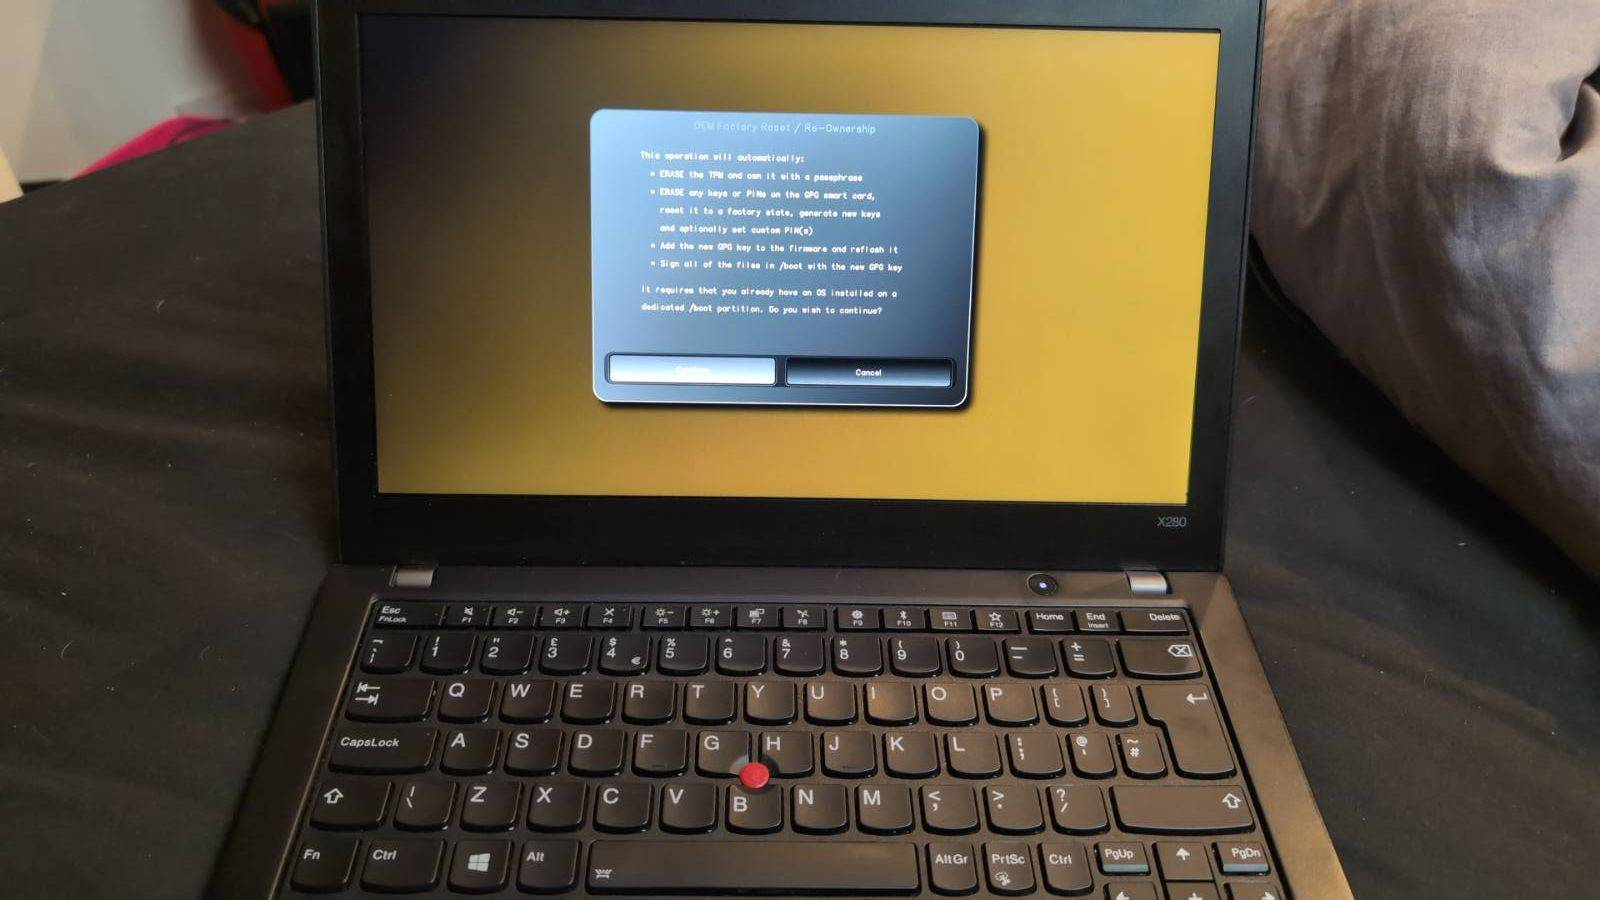 I took this photo while the NVMe still had an OS installed.